# PC SDK Unreal Walkthrough
To learn how to apply STOVE PC SDK 2.0 to an UNREAL-based game, we will explain how to link STOVE PC SDK to the HelloStove project and use the SDK API.
To complete this example: Before proceeding with the following example, install STOVE Launcher (opens new window) in advance and Preparing SDK development environment (opens new window) to obtain an App key, App secret, and Game Id.
HelloStove project was created inVisual Studio 2015 Update 3.
The 'Unreal StoveSDK plugin' of the HelloStove project supports only 'UNREAL engine 4.21.2' or later and requires pre-installation of 'EpicGamesLauncher' and 'UNREAL Editor'.
# Setting up STOVE Launcher
# A. Pre-preparation
This explains what you need to prepare in advance before proceeding with the build test.
# 1. Sign up for STOVE Studio and register a project
- Log in to the studio with an account registered in STOVE and register as a store developer.
- Register a new project through the "Release in Studio" menu on the studio screen.
- When you register a new project, you can check the "Game ID" and "Application Key" values on the project screen and obtain the project information required for PC SDK linkage.
# 2. Complete PC SDK linkage to game build
- PC SDK must be linked to game build, and the studio's project information (game ID, application key) must be included accurately when linking SDK.
If project information is not entered accurately, build test will not proceed.
# 3. Download New Client
- Download New Client (opens new window) through the top menu (GNB) of STOVE Store and install it on the PC to be tested.
# B. Activate Developer Mode
Activating developer mode is the task of allowing New Client to recognize the game build (linked with PC SDK) running on the local PC.
# 1. Create developer mode configuration file
- To activate the developer mode of New Client, the configuration file must be created with the name
policyconfig.json. If the file name is not accurate, New Client will not recognize the configuration file. - Go toC:\Users\%username%\AppData\Local\STOVE\Configand create apolicyconfig.jsonfile.
Path: ...\AppData\Local\STOVE\Config\PolicyConfig.json
# 2. Enter the settings
The final step to activate the developer mode of the New client is to write the settings as shown in the box below.
Warning
If the Stove Launcher is on, you must restart the Stove Launcher after writing. When testing via editor or exe, you must run it in administrator mode.
You can enter multiple game IDs registered in the studio in dev_game_list, and the game build that matches the entered game ID will communicate with the New client in developer mode and allow build testing on the local PC.
{
"stove_launcher_policy_config":
{
"dev_game_list": [ "Game ID", "Game ID"]
}
}
2
3
4
5
6
If the developer mode of the New client is not activated, check if the location of the policyconfig.json file is correct, and check if the game ID entered in policyconfig.json exactly matches the game ID registered in the studio.
# C. Proceed with the build test
Since the developer mode of the New client has been activated through the process described above, all the difficult steps have been completed, and the build test is possible by simply running the game build linked to the PC SDK while the New client is running.
The build test can be conveniently performed by running the exe file directly or in the debug mode of the development tool (Visual Studio, Unity, Unreal, etc.) so that the debugging process can be performed.
If a test payment is required in a game build linked with the IAP SDK, the above method is not supported. To perform a test payment, you must upload the build to the studio, enter the Studio Test menu in the New client, and then attempt a test payment.
# Download HelloStove Walkthrough Project
Download and unzip the HelloStove project for following from the link below.
The HelloStove project is in a state where the ‘UNREAL StoveSDK plugin’ is not integrated. Start by linking with UNREAL StoveSDK Plugin.
# Configuring the Project Environment
- Download the latest version of the
Unreal(C/C++)distribution file (Shown asPlugin) from the Download page
# 1) Configure Unreal Plugin Folder
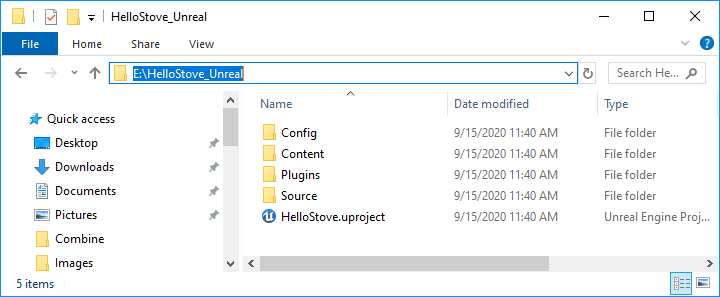
Unzip the STOVE PC SDK StovePCSDK_UNREAL_x.x.x.zip file in the StovePCSDK_UNREAL folder, the HelloStove project. Copy the Plugins folder that you see to the HelloStove project and configure it in a state where you can build HelloStove_Unreal as shown in the picture below.

If you double-click HelloStove.uproject, a window appears to select whether to rebuild UNREAL. (Depending on the UNREAL version, the engine version selection window may appear first) If you choose Yes (Y), it creates ancillary folders such as Binaries, Intermediate, and Saved in the corresponding folder. After creating an additional folder, it automatically executes the UNREAL editor.

# 2) Create VisualStudio Solution
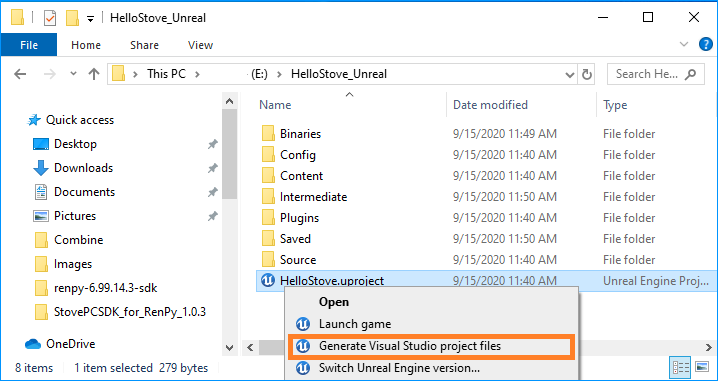
If you complete the Unreal build successfully, create HelloStove.sln using Unreal Engine.
You can right-click on the HelloStove.uproject and create a Visual Studio solution.
Depending on the UNREAL version, the
HelloStove.slnfile may be created first.

# 3) Configure StovePCSDKPlugin at Visual Studio Solution
Suppose you have completed creating the Visual Studio solution file. In that case, you require the following steps to integrate Plugin in the HelloStove project.
# a. Configure
StoveSDK_Unrealbuild module
To recognize the Plugin module in HelloStove_Unreal, add the module name dependency to the HelloStove.uproject and HelloStove.Build.cs files.
Double-click the HelloStove.sln file to run Visual Studio, open the HelloStove.uproject file in the solution explorer. Add StoveSDKPlugin, the plugin's name, in the "AdditionalDependencies" item shown in the code below.
- HelloStove.uproject
{
	"FileVersion": 3,
	"EngineAssociation": "4.21",
	"Category": "",
	"Description": "",
	"Modules": [
		{
			"Name": "HelloStove",
			"Type": "Runtime",
			"LoadingPhase": "Default",
			"AdditionalDependencies": [
                "UMG",
                "Engine",
                "CoreUObject",
                "StoveSDKPlugin"
			]
		}
	]
}
2
3
4
5
6
7
8
9
10
11
12
13
14
15
16
17
18
19
In HelloStove.Build.cs, add (AddRange) StoveSDKPlugin to PublicDependencyModuleNames and PrivateDependencyModuleNames modules as shown in the code below, respectively, to import the plugin into the UNREAL engine.
- HelloStove.Build.cs
using UnrealBuildTool;

public class HelloStove : ModuleRules
{
	public HelloStove(ReadOnlyTargetRules Target) : base(Target)
	{
		PCHUsage = PCHUsageMode.UseExplicitOrSharedPCHs;

		PublicDependencyModuleNames.AddRange(new string[] { "Core", "CoreUObject", "Engine", "InputCore", "Projects", "StoveSDKPlugin" });


        PrivateDependencyModuleNames.AddRange(new string[] { "Core", "CoreUObject", "Engine", "InputCore", "Projects", "StoveSDKPlugin" });

		// Uncomment if you are using Slate UI
		// PrivateDependencyModuleNames.AddRange(new string[] { "Slate", "SlateCore" });

		// Uncomment if you are using online features
		// PrivateDependencyModuleNames.Add("OnlineSubsystem");

		// To include OnlineSubsystemSteam, add it to the plugins section in your uproject file with the Enabled attribute set to true
	}
}
2
3
4
5
6
7
8
9
10
11
12
13
14
15
16
17
18
19
20
21
22
23
# b. Change parent class of
UMyStoveSDKObject
If you added the plugin's build module dependency through the above steps, proceed with the procedure below to use the Stove SDK function. Change the parent class of the derived class UMyStoveSDKObject from the existing UStoveSDKEmptyObject class to the new UStoveSDKObect class.
Before changing the parent class, the UMyStoveSDKObject class inherits the skeleton class UStoveSDKEmptyObject, but no function works. To use all the plugin functions, you need to include the header file StoveSDKObject.h and change it to inherit the UStoveSDKObect class.
- Before
#pragma once

#include "CoreMinimal.h"
#include "StoveSDKEmptyObject.h"
#include "MyStoveSDKObject.generated.h"

DECLARE_DELEGATE_OneParam(FDele_Delegate_Log, FString);


UCLASS()
class HELLOSTOVE_API UMyStoveSDKObject : public UStoveSDKEmptyObject
{
    GENERATED_BODY()
protected:
    // Called when the game starts or when spawned
   ...
2
3
4
5
6
7
8
9
10
11
12
13
14
15
16
17
- After
#pragma once

#include "CoreMinimal.h"
#include "StoveSDKObject.h"
#include "MyStoveSDKObject.generated.h"

DECLARE_DELEGATE_OneParam(FDele_Delegate_Log, FString);


UCLASS()
class HELLOSTOVE_API UMyStoveSDKObject : public UStoveSDKObject
{
    GENERATED_BODY()
protected:
    // Called when the game starts or when spawned

    ...
2
3
4
5
6
7
8
9
10
11
12
13
14
15
16
17
After completing the parent class change, delete StoveSDKEmptyObect.h from the project or comment out the header. The build will proceed without any problem.
# c. Set
UMyStoveSDKObectMember variables inUMyGameInstance
Remove the comment in the code below marked with /*remark delete*/ in HelloStove UMyGameInstance.
- UMyGameInstance.h
#include "CoreMinimal.h"
#include "Engine/GameInstance.h"
/*remark delete*/
/*#include "MyStoveSDKObject.h"*/
#include "MyGameInstance.generated.h"

UCLASS()
class HELLOSTOVE_API UMyGameInstance : public UGameInstance
{
	GENERATED_BODY()
public:
	UMyGameInstance()
	{
		/*remark delete*/
		/*_stoveSDKObject = NewObject<UMyStoveSDKObject>();*/
	}

private:
	/*remark delete*/
    /*UPROPERTY()
    UMyStoveSDKObject* _stoveSDKObject;*/
};
2
3
4
5
6
7
8
9
10
11
12
13
14
15
16
17
18
19
20
21
22
23
# d. Button event connection of
MyUserWidget
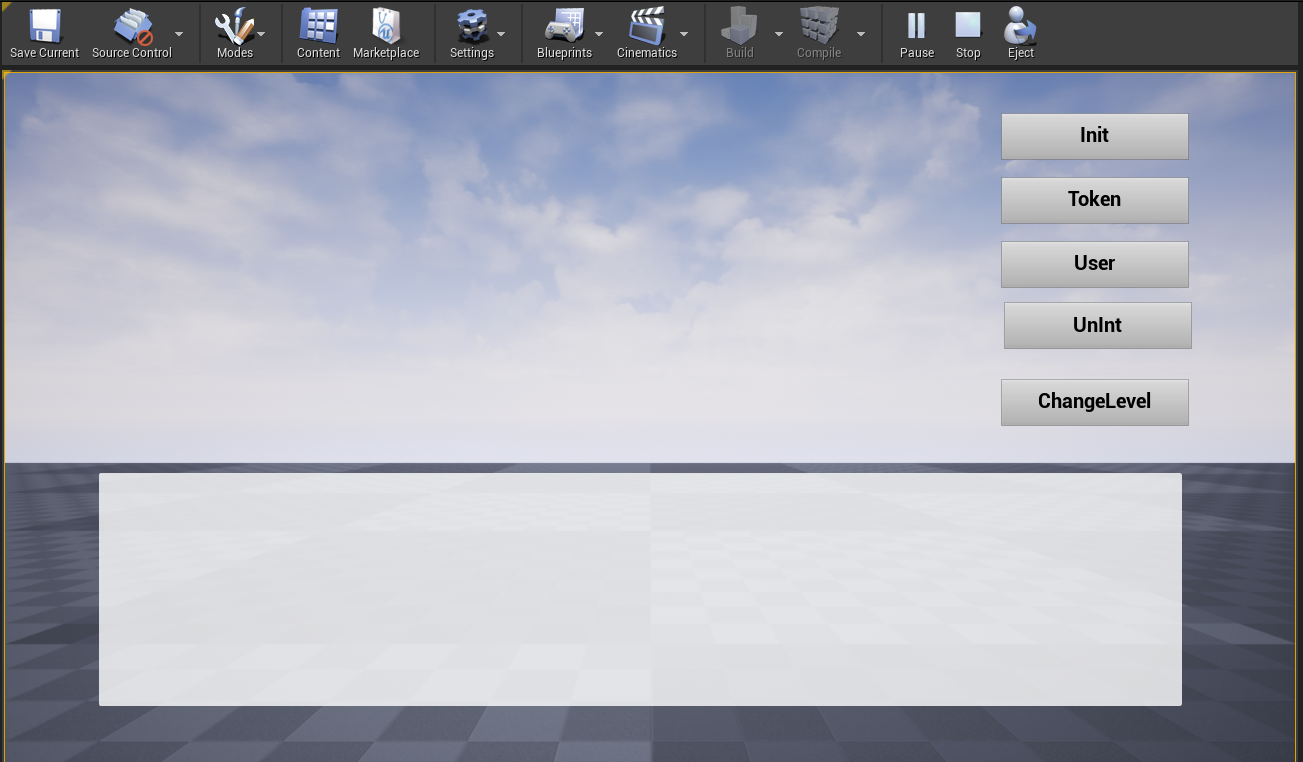
There is a button in HelloStove to test the StoveSDK API call. To integrate Plugin and connect with button event, remove the comment in the code below marked with /*remark delete*/ of the UMyHelloStoveWidget class.
- UMyHelloStoveWidget.cpp
    /*remark delete*/
	/*auto stoveSDKObject = Cast<UMyStoveSDKObject>(FindStoveSDKObject());
	stoveSDKObject->_OnDeleLog.BindUObject(this, &UMyHelloStoveWidget::OnEventLog);*/

void UMyHelloStoveWidget::OnClickInit()
{
	/*remark delete*/
	/*auto stoveSDKObject = Cast<UMyStoveSDKObject>(FindStoveSDKObject());
	stoveSDKObject->StoveSDKInit(FStoveConfig{});*/
}

void UMyHelloStoveWidget::OnClickToken()
{
	/*remark delete*/
	/*auto stoveSDKObject = Cast<UMyStoveSDKObject>(FindStoveSDKObject());
	stoveSDKObject->StoveSDKGetToken();*/
}

void UMyHelloStoveWidget::OnClickUser()
{
	/*remark delete*/
	/*auto stoveSDKObject = Cast<UMyStoveSDKObject>(FindStoveSDKObject());
	stoveSDKObject->StoveSDKGetUser();*/
}

void UMyHelloStoveWidget::OnClickUnInit()
{
	/*remark delete*/
	/*auto stoveSDKObject = Cast<UMyStoveSDKObject>(FindStoveSDKObject());
	stoveSDKObject->StoveSDKUnInit();*/
}
2
3
4
5
6
7
8
9
10
11
12
13
14
15
16
17
18
19
20
21
22
23
24
25
26
27
28
29
30
31
32
# SDK Initialization
To initialize the SDK, set the environment value of StoveSDK in the FStovePCConfig structure,
and write the example code below into the UMyStoveSDKObject::StoveSDKInit function.
Caution
Change YOUR_APP_KEY, YOUR_SECRET_KEY, and YOUR_GAME_ID to the pre-issued data.
If you call the UMyStoveSDKObject::StoveSDKInit function without logging into the Stove Launcher, an error occurs.
MyStoveSDKObject.cpp
FStoveResult UMyStoveSDKObject::StoveSDKInit(const FStoveConfig& Config)
{
    /*Add some 'follow along' code here:*/
    /*In this function, ignore Config received as a function argument. */
    //config
    FStoveConfig ReplaceConfig{
        "LIVE",
        "YOUR_APP_KEY",
        "YOUR_SECRET_KEY",
        "YOUR_GAME_ID",
        STOVE_PC_LOG_LEVEL_DEBUG,
        "" };  // logpath
    FStoveResult ErrorResult = Super::StoveSDKInit(ReplaceConfig);
    if (ErrorResult.Result == STOVE_PC_NO_ERROR)
    {
        OnLog("[Success] StovePC_Init");
    }
    else
    {
        OnLog("[Error] StovePC_Init, Result %d", ErrorResult.Result);
    }
    return ErrorResult;
}
2
3
4
5
6
7
8
9
10
11
12
13
14
15
16
17
18
19
20
21
22
23
Precautions
The PCSDK log path must be set as an absolute path. ex) C:\Program Files\{Your Game Folder}\Logs Do not add "\" at the end. PCSDK automatically adds the file name "StovePCSDK.log".
If "" is set as an empty string, PCSDK automatically creates a log in the path of the game executable file folder or the folder where the PCSDK DLL is located.
Change YOUR_APP_KEY, YOUR_SECRET_KEY, YOUR_GAME_ID in the code above to the ID and Key-value registered in STOVE Studio (opens new window) in advance. If you call the
Super::StoveSDKInitfunction without logging in to the stove launcher with the stove account applied for entry into STOVE Studio, error code 150 (sgup initialization failure) occurs.
If the return value of the UMyStoveSDKObject::StoveSDKInit function is STOVE_PC_NO_ERROR that is, 'success', enter true in the _isOnCallback value in the UStoveSDKObject::StoveSDKInit function, which is the super class of UMyStoveSDKObject. You will use the UStoveSDKObject::Tick function like a timer.
To check whether the UMyStoveSDKObject::StoveSDKInit function was successfully completed, add OnLog to the callback UMyStoveSDKObject::OnInitComplete function as shown below.
void UMyStoveSDKObject::OnInitComplete()
{
    /*Add the 'walkthrough' codes here.*/

    OnLog("[Success] InitComplete");
}
2
3
4
5
6
7
If the UMyStoveSDKObject::StoveSDKInit function or any other plugin's function call fails, you can check the error code through the callback UMyStoveSDKObject::OnError function. To check the error code, you can get error information through the FStoveError structure entered as an argument for the UMyStoveSDKObject::OnError function shown below.
MyStoveSDKObject.cpp
void UMyStoveSDKObject::OnError(FStoveError Error)
{
    /*Add the 'walkthrough' codes here.*/

    OnLog("[Error]");
    OnLog("FuncType: %d", Error.FunctionType);
    OnLog("Result: %d", Error.ErrorResult.Result);
    OnLog("ExternalError: %d", Error.ExternalError);
}
2
3
4
5
6
7
8
9
# SDK Termination
After all usage of the plugin is finished, to clean up the resources, you can release the plugin resource by calling the Super::StoveSDKUnInit function of Super Glass to the UMyStoveSDKObject::StoveSDKUnInit function as shown in the code below.
MyStoveSDKObject.cpp
FStoveResult UMyStoveSDKObject::StoveSDKUnInit()
{
    /*Add the 'walkthrough' codes here.*/

    //SDK Termination
    FStoveResult ErrorResult = Super::StoveSDKUnInit();
    if (ErrorResult.Result == STOVE_PC_NO_ERROR)
    {
        OnLog("[Success] StovePC_UnInit");
    }
    else
    {
        OnLog("[Error] StovePC_UnInit, Result %d", ErrorResult.Result);
    }

    return ErrorResult;
}
2
3
4
5
6
7
8
9
10
11
12
13
14
15
16
17
# Receive User Information
To get the logged-in user information on the STOVE launcher, request the user information by calling the superclass's Super:: StoveSDKGetUser function in the UMyStoveSDKObject::StoveSDKGetUser function in the calling code below. When you call the Super::StoveSDKGetUser function, it passes user information to the callback OnUser function.
MyStoveSDKObject.cpp
FStoveResult UMyStoveSDKObject::StoveSDKGetUser()
{
    /*Add the 'walkthrough' codes here.*/

    FStoveResult ErrorResult = Super::StoveSDKGetUser();
    if (ErrorResult.Result == STOVE_PC_NO_ERROR)
    {
        OnLog("[Success] StovePC_GetUser");
    }
    else
    {
        OnLog("[Error] StovePC_GetUser, ErrorResult %d", ErrorResult.Result);
    }
    return ErrorResult;
}
2
3
4
5
6
7
8
9
10
11
12
13
14
15
You obtain user information through the FStoveUser structure, which is an argument of the callback OnUser when you call the UMyStoveSDKObject::StoveSDKGetUser function usually. You can check how to obtain user information through the code below.
MyStoveSDKObject.cpp
void UMyStoveSDKObject::OnUser(FStoveUser User)
{
    /*Add the 'walkthrough' codes here.*/

    OnLog("[User]");
    OnLog("MemberNo : %u", User.MemberNo);
    OnLog("Nickname : %s", *(User.Nickname));
    OnLog("GameUserId: %s", *(User.GameUserId));

}
2
3
4
5
6
7
8
9
10
# Get Token Information
To get token information of the STOVE launcher user, call the UMyStoveSDKObject::StoveSDKGetToken function and the superclass Super::StoveSDKGetToken function to obtain it. After calling the StoveSDKGetToken function, you can check the token information as an argument of the callback OnToken function.
MyStoveSDKObject.cpp
FStoveResult UMyStoveSDKObject::StoveSDKGetToken()
{
    /*Add the 'walkthrough' codes here.*/

    FStoveResult ErrorResult = Super::StoveSDKGetToken();
    if (ErrorResult.Result == StovePCResult::STOVE_PC_NO_ERROR)
    {
        OnLog("[Success] StovePC_GetToken");
    }
    else
    {
        OnLog("[Error] StovePC_GetToken, Result %d", ErrorResult.Result);
    }

    return ErrorResult;
}
2
3
4
5
6
7
8
9
10
11
12
13
14
15
16
17
What is a token? It is the access token of the logged-in user in
STOVE Launcher, and the game server passes this access token to the stove authentication server to validate the logged-in user.
For a detailed explanation of Access Token, please get in touch with Contact Stove Indie Team (opens new window) for technical support.
When you call the StoveSDKGetToken function usually, you can check the token information through FStoveToken, the argument of the callback OnToken function.
void UMyStoveSDKObject::OnToken(FStoveToken Token)
{
    /*Add the 'walkthrough' codes here.*/

    OnLog("[Token]");
    OnLog("Token : %s", *(Token.AccessToken));
}
2
3
4
5
6
7
# Build and execute
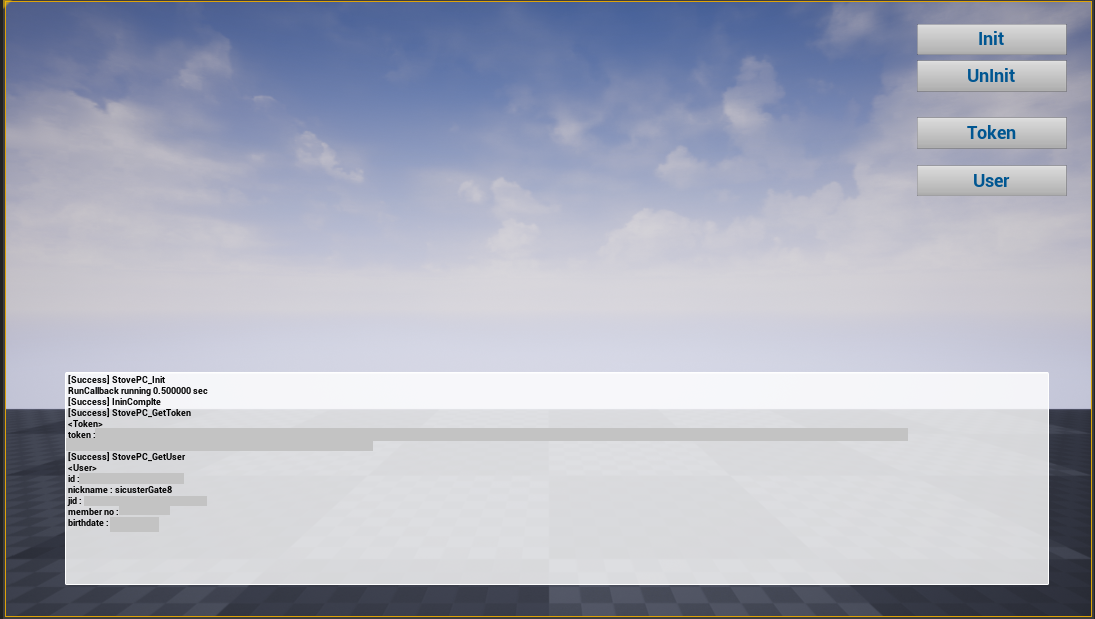
After build the HelloStove project, run it. When the UNREAL editor is running, press the Play button on the toolbar to run the demo and check if it usually works by pressing each button displayed on the screen in order.

Congratulations!
You have successfully completed the PC SDK Unreal walkthrough.