# Preparing SDK development environment
# What is SDK development environment preparation?
Refers to the process of pre-registering games for testing and sale on the STOVE Studio console to use the STOVE PC SDK. The process for registering a game on the STOVE Studio console is summarized below.

# 1. Apply to enter STOVE Studio
(1) Stove membership registration by Email and account creation at STOVE Studio (opens new window)
(2) Select Starting Studio in STOVE Studio
(3) After selecting Sign up for Pre-launch, agree to terms and conditions and register team information
(4) Complete store application
# 2. Register STOVE Studio project
(1) After completing the STOVE Studio application,
(2) Select Register Project on the STOVE Studio console screen
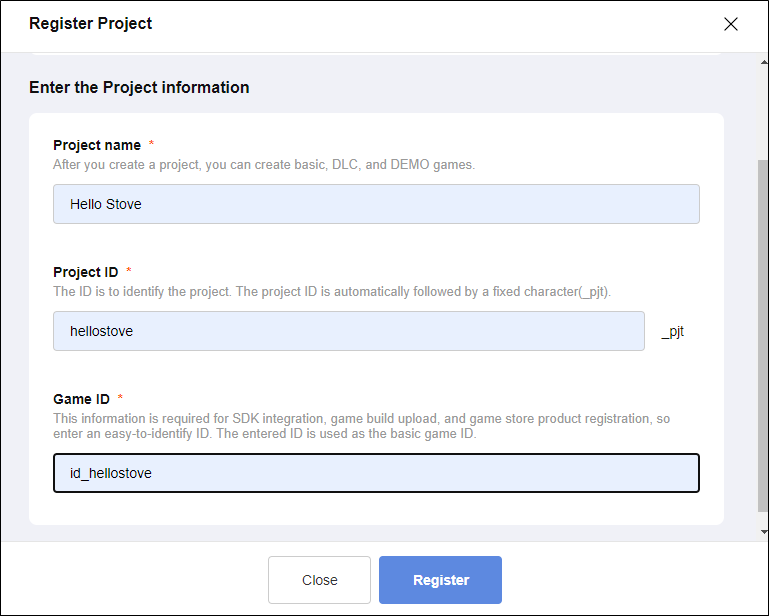
(3) Enter the project name, project ID, and game ID in the project registration pop-up window and click Register

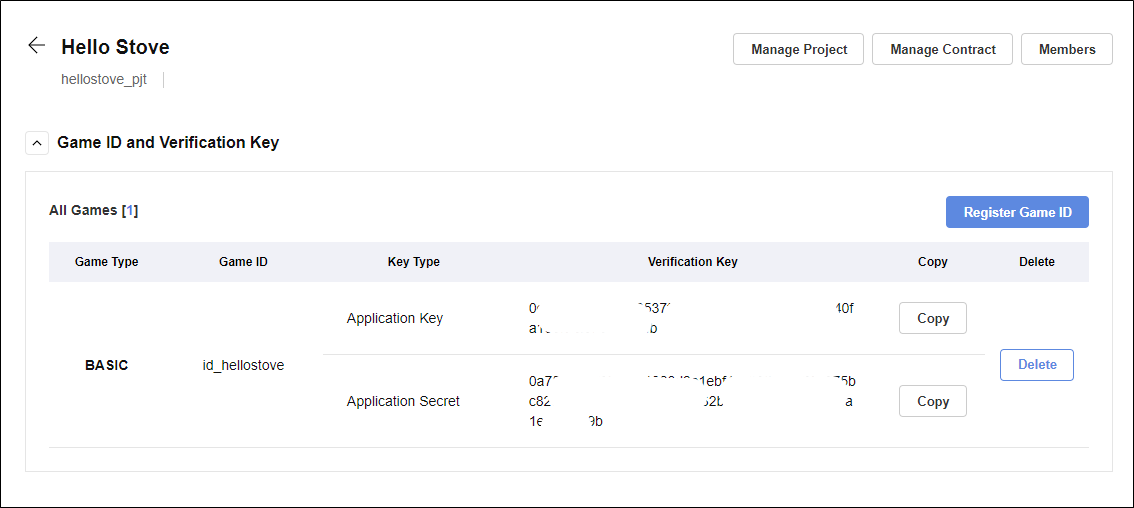
- Game ID, Application Key, Application Secret

(5) In the SDK integration code of the following example, enter the authentication key value shown in figure 4 above.
# 3. STOVE Launcher Settings
# A. Pre-preparation
This explains what you need to prepare in advance before proceeding with the build test.
# 1. Sign up for STOVE Studio and register a project
- Log in to the studio with an account registered in STOVE and register as a store developer.
- Register a new project through the "Release in Studio" menu on the studio screen.
- When you register a new project, you can check the "Game ID" and "Application Key" values on the project screen and obtain the project information required for PC SDK linkage.
# 2. Complete PC SDK linkage to game build
- PC SDK must be linked to game build, and the studio's project information (game ID, application key) must be included accurately when linking SDK.
If project information is not entered accurately, build test will not proceed.
# 3. Download New Client
- Download New Client (opens new window) through the top menu (GNB) of STOVE Store and install it on the PC to be tested.
# B. Activate Developer Mode
Activating developer mode is the task of allowing New Client to recognize the game build (linked with PC SDK) running on the local PC.
# 1. Create developer mode configuration file
- To activate the developer mode of New Client, the configuration file must be created with the name
policyconfig.json. If the file name is not accurate, New Client will not recognize the configuration file. - Go toC:\Users\%username%\AppData\Local\STOVE\Configand create apolicyconfig.jsonfile.
Path: ...\AppData\Local\STOVE\Config\PolicyConfig.json
# 2. Enter the settings
The final step to activate the developer mode of the New client is to write the settings as shown in the box below.
Warning
If the Stove Launcher is on, you must restart the Stove Launcher after writing. When testing via editor or exe, you must run it in administrator mode.
You can enter multiple game IDs registered in the studio in dev_game_list, and the game build that matches the entered game ID will communicate with the New client in developer mode and allow build testing on the local PC.
{
"stove_launcher_policy_config":
{
"dev_game_list": [ "Game ID", "Game ID"]
}
}
2
3
4
5
6
If the developer mode of the New client is not activated, check if the location of the policyconfig.json file is correct, and check if the game ID entered in policyconfig.json exactly matches the game ID registered in the studio.
# C. Proceed with the build test
Since the developer mode of the New client has been activated through the process described above, all the difficult steps have been completed, and the build test is possible by simply running the game build linked to the PC SDK while the New client is running.
The build test can be conveniently performed by running the exe file directly or in the debug mode of the development tool (Visual Studio, Unity, Unreal, etc.) so that the debugging process can be performed.
If a test payment is required in a game build linked with the IAP SDK, the above method is not supported. To perform a test payment, you must upload the build to the studio, enter the Studio Test menu in the New client, and then attempt a test payment.
# Follow Through Practice
- If you have completed all preparations, understand the basic flow of the integration through the follow through pages for each engine.