# PC SDK Unity Follow Through
It's an example to follow to learn how to apply STOVE PC SDK 2.0 to a Unity engine game.
Before proceeding with the following example, install STOVE Launcher (opens new window) in advance and Preparing SDK development environment (opens new window) and obtain App key, App secret, and Game Id in advance. For example, we recommend Unity 2017 or higher, VisualStudio 2017, or higher version.
# Setting up STOVE Launcher
# A. Pre-preparation
This explains what you need to prepare in advance before proceeding with the build test.
# 1. Sign up for STOVE Studio and register a project
- Log in to the studio with an account registered in STOVE and register as a store developer.
- Register a new project through the "Release in Studio" menu on the studio screen.
- When you register a new project, you can check the "Game ID" and "Application Key" values on the project screen and obtain the project information required for PC SDK linkage.
# 2. Complete PC SDK linkage to game build
- PC SDK must be linked to game build, and the studio's project information (game ID, application key) must be included accurately when linking SDK.
If project information is not entered accurately, build test will not proceed.
# 3. Download New Client
- Download New Client (opens new window) through the top menu (GNB) of STOVE Store and install it on the PC to be tested.
# B. Activate Developer Mode
Activating developer mode is the task of allowing New Client to recognize the game build (linked with PC SDK) running on the local PC.
# 1. Create developer mode configuration file
- To activate the developer mode of New Client, the configuration file must be created with the name
policyconfig.json. If the file name is not accurate, New Client will not recognize the configuration file. - Go toC:\Users\%username%\AppData\Local\STOVE\Configand create apolicyconfig.jsonfile.
Path: ...\AppData\Local\STOVE\Config\PolicyConfig.json
# 2. Enter the settings
The final step to activate the developer mode of the New client is to write the settings as shown in the box below.
Warning
If the Stove Launcher is on, you must restart the Stove Launcher after writing. When testing via editor or exe, you must run it in administrator mode.
You can enter multiple game IDs registered in the studio in dev_game_list, and the game build that matches the entered game ID will communicate with the New client in developer mode and allow build testing on the local PC.
{
"stove_launcher_policy_config":
{
"dev_game_list": [ "Game ID", "Game ID"]
}
}
2
3
4
5
6
If the developer mode of the New client is not activated, check if the location of the policyconfig.json file is correct, and check if the game ID entered in policyconfig.json exactly matches the game ID registered in the studio.
# C. Proceed with the build test
Since the developer mode of the New client has been activated through the process described above, all the difficult steps have been completed, and the build test is possible by simply running the game build linked to the PC SDK while the New client is running.
The build test can be conveniently performed by running the exe file directly or in the debug mode of the development tool (Visual Studio, Unity, Unreal, etc.) so that the debugging process can be performed.
If a test payment is required in a game build linked with the IAP SDK, the above method is not supported. To perform a test payment, you must upload the build to the studio, enter the Studio Test menu in the New client, and then attempt a test payment.
# Downloading a Follow Through HelloStove Project
Unzip it when the download is complete.
This project doesn't have the PC SDK integrated yet. Let's start integrating the PC SDK
# 1) Download the project
Once downloaded, unzip it.
This project doesn't have the PC SDK linked yet. Let's start integrating the PC SDK now.
# 2) Download the Unity package
If you are using a different version of Unity, download the HelloStove_UnityPackage archive from the link below. Create a project with your version of the Unity Editor and follow along.
- Download the HelloStove_UnityPackage archive
Once the download is complete, unzip it.
Import the HelloStove_UnityPackage.unitypackage custom package under the project Assets folder you created.
# 3) Open the following project
This project doesn't have the PC SDK linked yet. Let's start integrating the PC SDK now. In the Unity Editor, open the HellowStove_Unity project (or a project of your own creation)
# Configuring Project Settings
- Download the latest version of the Unity (C#) distribution file (from now on referred to as
StovePCSDK_NET) from the STOVE PC SDK download page.
After unpacking StovePCSDK_NET, delete the x86 (32 bit) folders or the x86_64 (64 bit) folder, and then copy (overwrite) the StovePCSDK folder to the Assets folder of the HelloStove_Unity project. If both the x86 folder and the x86_64 folder exist, a build error may occur.
# 1) Execute Scenes
Open the HellowStove_Unity project in the Unity Editor.
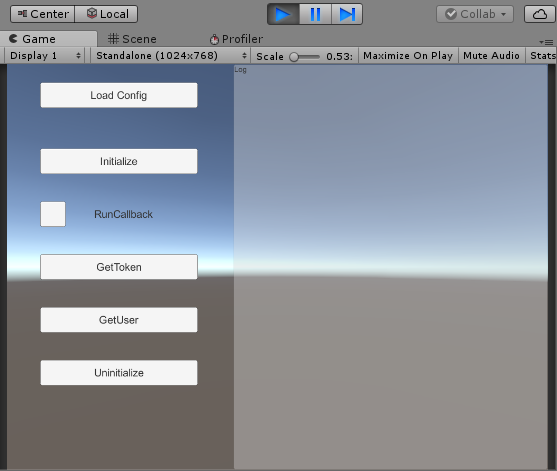
Click on the Play button in the editor toolbar.
It plays the scene in the game view if all settings are standard.
Click on the Play button in the editor toolbar once more to close the playing scene.
# 2) Building
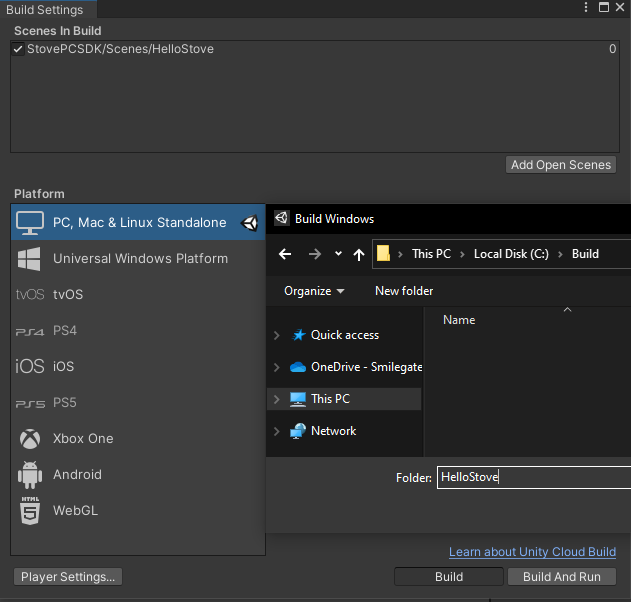
Click on the File > BuildSetting menu.
Click on the Build button in the Build Settings window.
Select the folder to save the resulting build from the build window.
Enter "HelloStove" as the file’s name and click on the save button.
If there are no problems in the settings, the build will be smooth without any compiling errors.
# 3) Getting Ready to Write Scripts
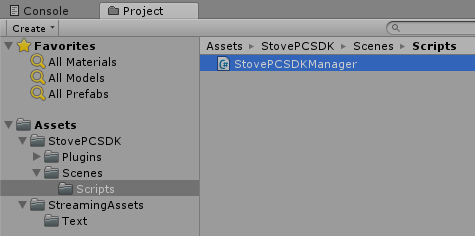
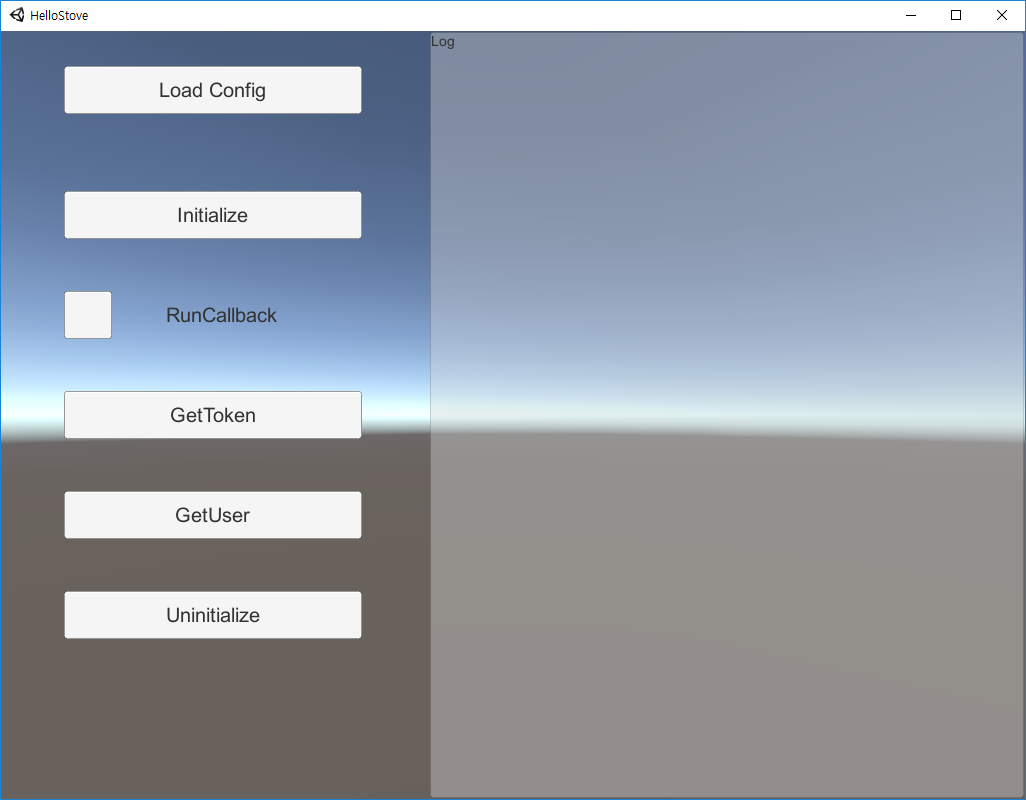
Open the Assets > StovePCSDK > Scenes > Scripts > StovePCSDKManager.cs file.
# 4) StovePCConfig
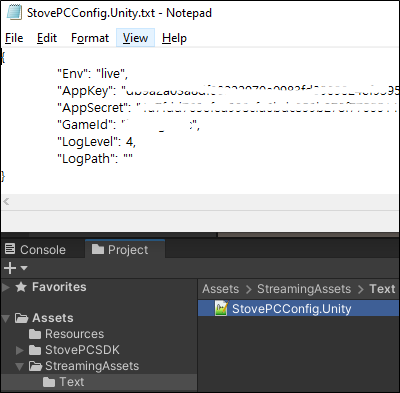
Open the file Assets > StreamingAssets > Text > StovePCConfig.Unity.txt Fill in the AppKey, AppSecret, and GameId values issued in advance from Stove Studio (opens new window) and save it.
StovePC.Initializefunction without logging into the stove launcher with theSTOVE accountapplied for entry into STOVE Studio, error code 150 (sgup initialization failed) occurs.
# SDK Initialization
To initialize PC SDK, fill in the values for StovePCConfig and StovePCCallback structures, and call the StovePC.Initialize method.
Enter the code piece below in the ButtonInitialize_Click method.
StovePCConfig config = new StovePCConfig
{
    Env = this.Env,
    AppKey = this.AppKey,
    AppSecret = this.AppSecret,
    GameId = this.GameId,
    LogLevel = this.LogLevel,
    LogPath = this.LogPath
};

this.callback = new StovePCCallback
{
    OnError = new StovePCErrorDelegate(this.OnError),
    OnInitializationComplete = new StovePCInitializationCompleteDelegate(this.OnInitializationComplete),
    OnToken = new StovePCTokenDelegate(this.OnToken),
    OnUser = new StovePCUserDelegate(this.OnUser)
};

sdkResult = StovePC.Initialize(config, callback);
2
3
4
5
6
7
8
9
10
11
12
13
14
15
16
17
18
19
Precautions
The PCSDK log path must be set as an absolute path. ex) C:\Program Files\{Your Game Folder}\Logs Do not add "\" at the end. PCSDK automatically adds the file name "StovePCSDK.log".
If "" is set as an empty string, PCSDK automatically creates a log in the path of the game executable file folder or the folder where the PCSDK DLL is located.
YOUR_APP_KEY, YOUR_SECRET_KEY, YOUR_GAME_ID must be changed to data issued in advance.
An error occurs if you call the StovePC.Initialize function without logging into the Stove Launcher.
Write a callback when the StovePC.Initialize function call usually completes.
Write the code snippet below in the OnInitializationComplete method.
sb.AppendLine("OnInitializationComplete");
sb.AppendFormat(" - nothing");
2
# SDK Termination
To clear the currently used resources after using STOVE Service, call the StovePC.Uninitialize method.
Enter the code piece below in the ButtonUninitialize_Click method.
sdkResult = StovePC.Uninitialize();
# Acquiring User Information
Call the StovePC.GetUser method to acquire the information of a logged in user.
Enter the code piece below in the ButtonGetUser_Click method.
sdkResult = StovePC.GetUser();
To get the logged-in user information, call the GetUser method.
Write the code snippet below in the OnUser method.
sb.AppendLine("OnUser");
sb.AppendFormat(" - user.MemberNo : {0}" + Environment.NewLine, user.MemberNo.ToString());
sb.AppendFormat(" - user.Nickname : {0}" + Environment.NewLine, user.Nickname);
sb.AppendFormat(" - user.GameUserId : {0}", user.GameUserId);
2
3
4
# Acquiring Token Information
Call the StovePC.GetToken method to acquire the token information of a logged-in user.
Enter the code piece below in the ButtonGetToken_Click method.
sdkResult = StovePC.GetToken();
STOVE Launcher, and the game server passes this access token to the stove authentication server to validate the logged-in user.
For a detailed explanation of Access Token, please get in touch with store.support@smilegate.com for technical support.
Write a callback function when the GetToken function call usually completes.
Write the code snippet below in the OnToken method.
sb.AppendLine("OnToken");
sb.AppendFormat(" - token.AccessToken : {0}", token.AccessToken);
2
# Build and Execute
Save the written script.
Click on the File > Build & Run menu in the Unity Editor.
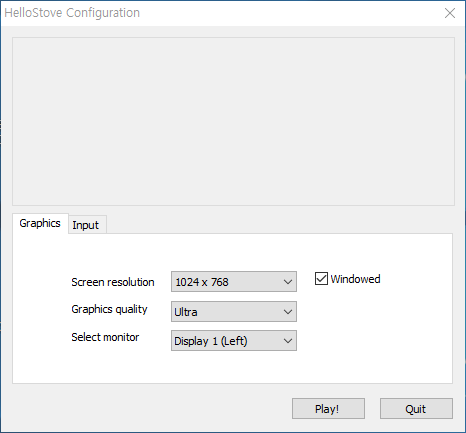
Set the screen resolution field value as 1024 x 768, and check on the Windowed check box.
Click on the Play! Button.
Congratulations!
You have successfully completed the HelloStove Follow Through.